※ 안드로이드 개발을 하다보면 alert dialog는 아닌데 지금 있는 레이아웃 위에 alert dialog처럼 보여줘야 할때가 있다.
(dialog는 커스터마이징 해도 테두리를 없앨수가 없다. 그렇기 때문에 레이아웃을 겹쳐 만들었다.)
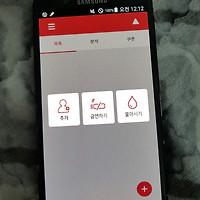
아래에 빨간 원안의+ 버튼을 누르면 버튼 3개가 보이면서 투명도를 준 레이아웃이 겹치게 해주었다.

 (후)
(후)activity_write_type.xml (위에 겹칠 레이아웃)
<?xml version="1.0" encoding="utf-8"?>
<LinearLayout xmlns:android="http://schemas.android.com/apk/res/android"
android:layout_width="match_parent"
android:layout_height="match_parent"
android:id="@+id/ll_writeChoice"
android:orientation="vertical">
<LinearLayout
android:layout_width="match_parent"
android:layout_height="0dp"
android:layout_weight="4"></LinearLayout>
<LinearLayout
android:layout_width="match_parent"
android:orientation="horizontal"
android:layout_height="0dp"
android:layout_weight="2">
<LinearLayout
android:layout_height="match_parent"
android:layout_width="0dp"
android:layout_weight="3.3"
android:paddingTop="10dp"
android:paddingLeft="20dp"
android:paddingBottom="10dp">
<ImageButton
android:id="@+id/btn_userWrite"
android:layout_width="0dp"
android:layout_height="match_parent"
android:layout_weight="3.3"
android:background="@drawable/btn_user_write"/>
</LinearLayout>
<LinearLayout
android:layout_height="match_parent"
android:layout_width="0dp"
android:layout_weight="3.3"
android:padding="10dp">
<ImageButton
android:id="@+id/btn_waterWrite"
android:layout_width="0dp"
android:layout_height="match_parent"
android:layout_weight="3.3"
android:background="@drawable/btn_no_smoking_write"/>
</LinearLayout>
<LinearLayout
android:layout_height="match_parent"
android:layout_width="0dp"
android:layout_weight="3.3"
android:paddingRight="20dp"
android:paddingTop="10dp"
android:paddingBottom="10dp">
<ImageButton
android:id="@+id/btn_noSmokingWrite"
android:layout_width="0dp"
android:layout_height="match_parent"
android:layout_weight="3.3"
android:background="@drawable/btn_water_write"/>
</LinearLayout>
</LinearLayout>
<LinearLayout
android:layout_width="match_parent"
android:layout_height="0dp"
android:layout_weight="4"></LinearLayout>
</LinearLayout>
ListActivity.java
protected void onCreate(Bundle savedInstanceState) {
super.onCreate(savedInstanceState);
//밑에 깔 레이아웃을 설정해주고
setContentView(R.layout.activity_list);
//구현......
}
//레이아웃을 위에 겹쳐서 올리는 부분
LayoutInflater inflater = (LayoutInflater)getSystemService(Context.LAYOUT_INFLATER_SERVICE);
//레이아웃 객체생성
LinearLayout ll = (LinearLayout)inflater.inflate(R.layout.activity_write_type, null);
//레이아웃 배경 투명도 주기
ll.setBackgroundColor(Color.parseColor("#99000000"));
//레이아웃 위에 겹치기
LinearLayout.LayoutParams paramll = new LinearLayout.LayoutParams
(LinearLayout.LayoutParams.FILL_PARENT,LinearLayout.LayoutParams.FILL_PARENT);
addContentView(ll, paramll);
//위에겹친 레이아웃에 온클릭 이벤트주기
ll.setOnClickListener(writeListener);
'플밍 is 뭔들 > 안드로이드' 카테고리의 다른 글
| [안드로이드] DrawLayout을 이용하여 멀티윈도우 생성 예제 (0) | 2017.02.11 |
|---|---|
| [안드로이드] dp -> px / px -> dp로 변환하기 (0) | 2017.02.11 |
| [안드로이드] dp, dip, sp, px의 차이 (0) | 2017.02.11 |
| [안드로이드] 레이아웃 중첩, 겹치기 삭제 (0) | 2017.01.23 |
| [안드로이드] dp, dip, sp, px의 차이 (0) | 2017.01.23 |